For those companies that do light manufacturing or assembly and don’t want or need the complexities inherent with full-blown GP Manufacturing, there is a rather little-known feature that works in conjunction with GP Inventory (currently only available with the Business Ready Licensing Advance Management pricing model) called ‘Inventory Bill of Materials’. Inventory BOM, along with the Assembly Entry transaction, provides a simple method for converting components into an assembled product. The Assembly transaction also decrements the components and increments the ‘Finished Good’ and performs the accounting entries, including variances.
The basis for the Assembly Transaction Entry is the Item Bill of Materials (BOM). The BOM is like a recipe for the product – it specifies what ingredients and how much of each ingredient are necessary to make the product – in this example – a fictitious, lot tracked product called ‘RTU’. The product could just as well be serial tracked, or have no tracking.
Here’s a picture of the BOM -

Cards>Inventory>Bill of Materials
As you can see, the Bill Number is RTU (considered the ‘Parent’ Item Number) and the Components are:
-
B5028 with a per unit quantity of 0.0672 Kilo
-
One Trigger
-
One FFP-RTU process
The screen above also indicates the Effective Date of the BOM, Standard Cost and other attributes.
This ‘recipe’ is used when we create an Assembly Transaction as can be seen in the next screen -
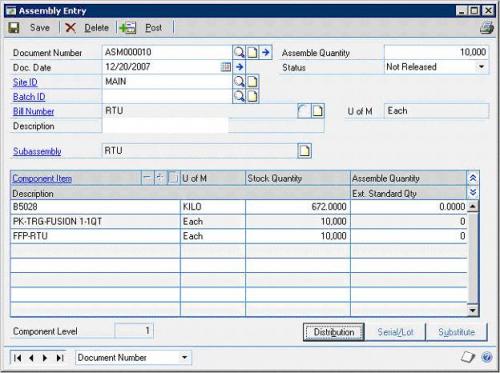
Transactions>Inventory>Assembly Entry
The Assembly Transaction window automatically completes the Document Number (can be overridden) the Doc Date and a Status of ‘New’. You need to fill in the following -
-
Site ID - each component or finished item can be assigned to multiple sites, but each must be available in the selected site before you can change the transaction status to Released.
-
Bill Number - the item to be assembled.
-
Assemble Quantity - the quantity of items to be assembled.
When you change the Status from ‘New’ to ‘Not Released’, the per unit Quantity from the BOM is multiplied by the Assemble Quantity – the result is the ‘Stock Quantity’. The Stock Quantity comes from the BOM and represents the ‘standard’ quantity required to build the assembly. For now, disregard the ‘Assemble Quantity’ field in the scrolling window - it only comes in to play if there is not enough stock of a subassembly to satisfy the requirements of this transaction.
If there is a difference between the Stock Quantity displayed in the scrolling window and the actual quantity required to build the assembly, change the Stock Quantity to the actual quantity. Changing the Stock Quantity will produce an ‘Assembly Variance’ that is recognized when the transaction is posted.
After you’ve updated the Stock Quantity, if necessary, change the Status to ‘Released’. When the Status is changed to Released, the ‘Serial/Lot Number’ button at the bottom of the window becomes active if the item is Serial or Lot tracked. Click the button to open the Serial/Lot Number window -
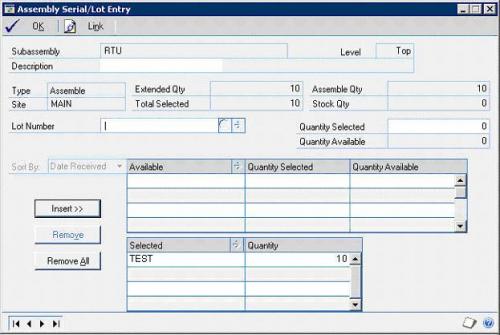
Type the Serial or Lot Number being assigned to this transaction in the ‘Serial Number’ or‘Lot Number’ field. Then enter the quantity for this Serial/Lot in the ‘Quantity Selected’ field. Then, click the ‘Insert’ button and ‘OK’ to complete the Serial/Lot Number assignment process. You’ll be taken back to the Assembly Entry window.
Next, click the ‘Distributions’ button to ensure the account distributions are correct -
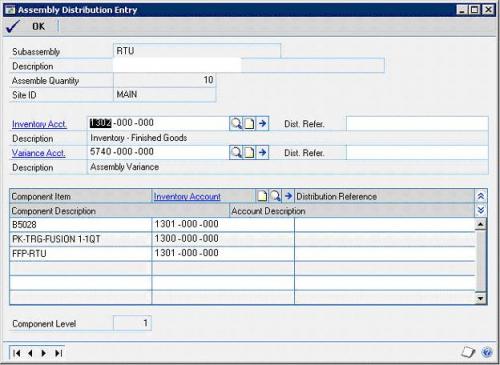
The inventory account is automatically populated based on the account assigned at the Item Card level. If a default Variance account ahs not been set, select the account you want the assembly variance to post to.
The Component Item Inventory Accounts default from the Component Item Card level.
When you’re happy with the Account distributions, click OK, which takes you back to the Assembly Entry window.
At this point you can either Save the entry to a batch or post it directly. When the transaction Is posted, the following posting journals are produced -
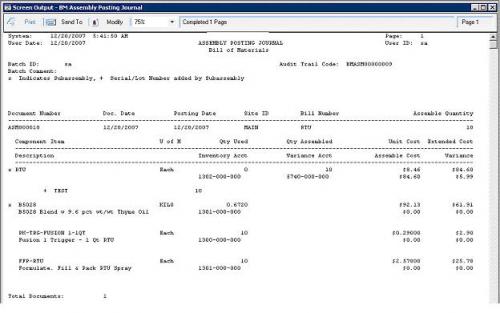
The Assembly Posting Journal reflects the quantity and cost of the components consumed to build the assembly and the quantity and cost of the Assembly built. If there is any variance as a result of either a Quantity (Volume) variance due to manufacturing discrepancies or a Price variance due to a discrepancy between Standard and Actual cost, that variance and the account it is being charged to is reflected on the second line of the assembled item line.
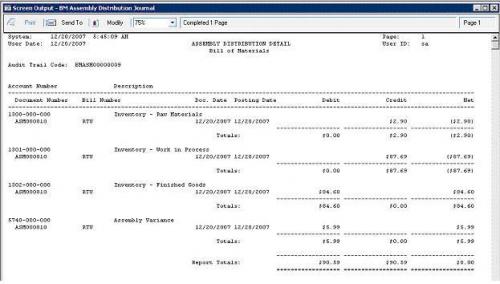
The second posting journal produced is the Assembly Distribution Detail. This is, in effect, the General Ledger Posting Journal -
Once an Assembly transaction is posted, it cannot be reversed. It can be modified or deleted prior to being posted if it has been saved.
If you need to reverse the effect of an Assembly transaction, that must be done using the Inventory Adjustment transaction (Transactions>Inventory>Transaction Entry) to update the quantities on hand of the Parent item and component items.


