


Time Periods List
The Time Periods List allows the user to review time periods that have been created in the system.
Create Timesheet Periods
Create Timesheet Periods is required to set up the periods for time entry.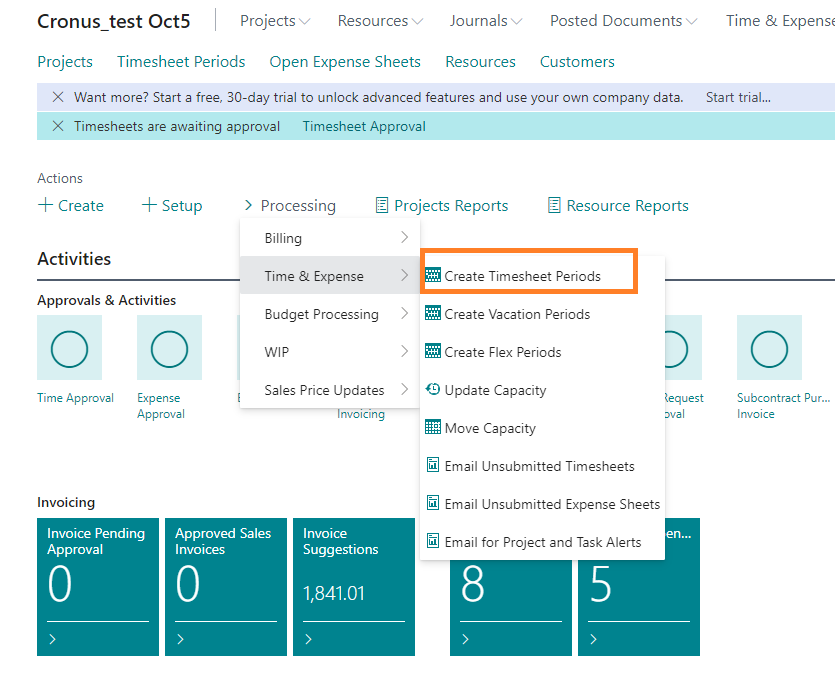
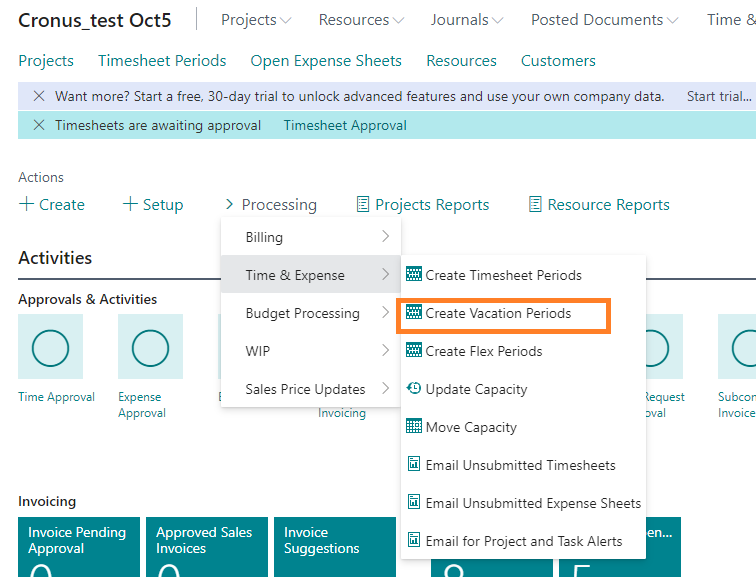
Create Vacation Time Periods
Create Vacation Periods is required to set up the periods for expense entry.
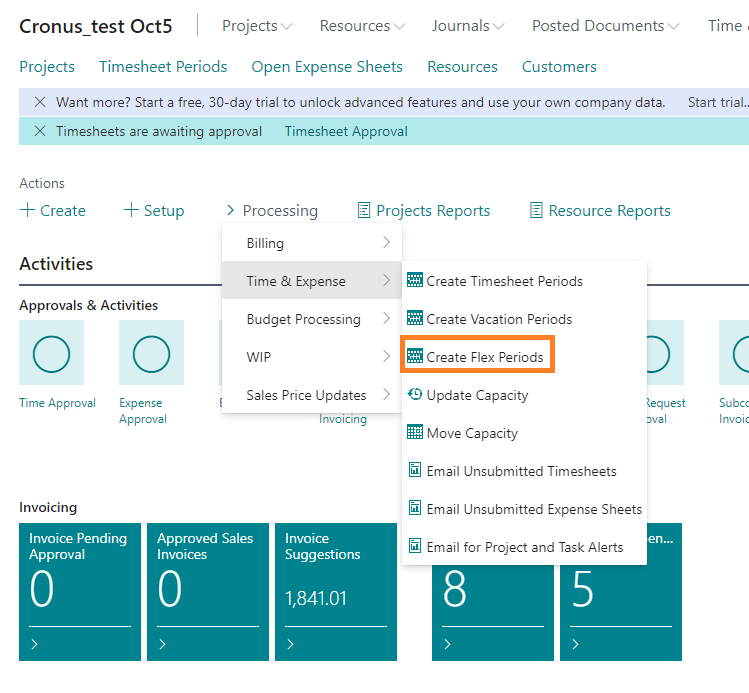
Create Flex Periods
Create Flex Periods is required to set up the periods for expense entry.
Vacation Periods List
The Vacation Periods List allows the user to review vacation periods that have been created in the system
Valid resource periods can be viewed in the Periods List. Resources cannot enter vacation on timesheets unless Vacation Periods have been generated for them.
You can generate Vacation Periods for all resources by running the process with no filter.
To create time periods:
Flex Periods List
The Flex Periods List allows the user to review Flex periods that have been created in the system.
Valid resource periods can be viewed in the Periods List. Resources cannot enter Flex time on timesheets unless Flex Periods have been generated for them.
You can generate Flex Periods for all resources by running the process with no filter.
To create Flex time periods:
The Time Periods List allows the user to review time periods that have been created in the system.
- Start Date: Displays the starting date for the period.
- End Date: Displays the Ending date for the period.
- Resource: Displays the name of the resource.
- Type: Displays the type of time period. Examples are Week/Month.
- Detail Level: Displays the detail time level within the time period. Examples are Day/Week.
- Description: Displays the Description of this time Period as it is named by the system.
- Open: Checked if the time period is currently open.
- Time Entry Status: Shows the status of the Timesheet period.
- Auto Adjust Flex Balance:
- Last Used:
Create Timesheet Periods
Create Timesheet Periods is required to set up the periods for time entry.
- Use Resource Employment date - check this option for the start date to be the date the resource started.
- Start Date - select the start date for creating the time periods (only valid if Use Resource Employment Date option is not selected).
- End Date - Select the end date for creating the time records.
- Period No. - enter a number to begin the numbering sequence of the time periods.
- Filter: Resource No - Filter field for selecting a resource. You can select one specific resource or remove the filter to create time periods for all resources.
- Click +Filter to add additional filters on the resource selection.
- Click Filter Total by: + Filter... to add additional filters on the totals.
Create Vacation Time Periods
Create Vacation Periods is required to set up the periods for expense entry.
- Use Resource Employment date - Check this option for the start date to be the date the resource started
- Start Date - Select the start date for creating the time periods (only valid if Use Resource Employment Date not checked).
- End Date - Select the end date for creating the time periods.
- Resource No - Filter field for selecting a resource. You can select one specific resource or remove the filter to create time periods for all.
Create Flex Periods
Create Flex Periods is required to set up the periods for expense entry.
- Use Resource Employment date - Check this option for the start date to be the date the resource started.
- Start Date - Select the start date for creating the time periods (only valid if Use Resource Employment Date not checked).
- End Date - Select the end date for creating the time periods
- Resource No - Filter field for selecting a resource. You can select one specific resource or remove the filter to create time periods for all.
Vacation Periods List
The Vacation Periods List allows the user to review vacation periods that have been created in the system
- Start Date: Displays the starting date for the period.
- End Date: Displays the Ending date for the period.
- Resource: Displays the name of the resource.
- Type: Displays the type of vacation period. Examples are Week/Month.
- Detail Level: Displays the detail time level within the vacation period. Examples are Day/Week.
- Description: Displays the Description of this vacation Period as it is named by the system.
- Open: Checked if the vacation period is currently open.
- Posted: Checked if the vacation period has been posted.
- Entries: Checked if entries exist for the vacation period/resource.
Time & Expense - Create Vacation Periods
Create Vacation Periods needs to be run for every employee to establish their timesheet vacation periods.Valid resource periods can be viewed in the Periods List. Resources cannot enter vacation on timesheets unless Vacation Periods have been generated for them.
You can generate Vacation Periods for all resources by running the process with no filter.
To create time periods:
- Navigate to the Role Center and select Processing > Time & Expense > Create Vacation Periods
- An options page opens which lets you select settings and filters.
- Use resource employment date: Specifies the value of the Use Resource Employment Date field. Select this option to use the date the resource started their employment.
- Start Date: Specifies the value of the Start Date field if Use resource employment date is not selected.
- End Date: Specifies the value of the End Date field (which is used as the end date for creating vacation periods).
- Filter: Resource: You can specify a resource number if you want to create vacation periods for just one resource.
- Filter: You can also select other values to filter results on, to narrow down the resource lists, based on the filters you select.
Flex Periods List
The Flex Periods List allows the user to review Flex periods that have been created in the system.
- Start Date: Displays the starting date for the period.
- End Date: Displays the Ending date for the period.
- Resource: Displays the name of the resource.
- Type: Displays the type of flex period. Examples are Week/Month.
- Detail Level: Displays the detail level within the period. Examples are Day/Week.
- Description: Displays the Description of this Flex Period as it is named by the system.
- Open: Checked if the Flex period is currently open.
- Posted: Checked if the Flex period has been posted.
- Entries: Checked if entries exist for the Flex period/resource.
Time & Expense - Create Flex Periods
Create Flex Periods needs to be run for every employee to establish their timesheet Flex periods.Valid resource periods can be viewed in the Periods List. Resources cannot enter Flex time on timesheets unless Flex Periods have been generated for them.
You can generate Flex Periods for all resources by running the process with no filter.
To create Flex time periods:
- Navigate to the Role Center and select Processing > Time & Expense > Create Flex Periods
- An options page opens which lets you select settings and filters.
- Use resource employment date: Specifies the value of the Use Resource Employment Date field. Select this option to use the date the resource started their employment.
- Start Date: Specifies the value of the Start Date field if Use resource employment date is not selected.
- End Date: Specifies the value of the End Date field (which is used as the end date for creating Flex Periods).
- Filter: Resource: You can specify a resource number if you want to create Flex Periods for just one resource.
- Filter: You can also select other values to filter results on, to narrow down the resource lists, based on the filters you select.