


The Timesheet Configurations List page can have multiple setups. Depending on the employee type, you may want to have a different configuration setup. This allows for a variety of general settings such as starting day for the work week time validation and timesheet settings for length of time and approvals. Expense Sheet options are also located in the Timesheet Configurations List page.
The configuration provides one simple place of entry to create a configuration used by multiple resource. Depending on your timesheet entry needs, you will likely only need one timesheet configuration. However, if you have multiple timesheet recording periods, overtime factors, approval workflows, etc. then additional timesheet configurations will be required.
The timesheet configuration defines multiple options related to a resource.
To create new entries in Timesheet Configurations List:
Navigate to the Role Center > Setup >Resource Setup > Timesheet Config List

The configuration provides one simple place of entry to create a configuration used by multiple resource. Depending on your timesheet entry needs, you will likely only need one timesheet configuration. However, if you have multiple timesheet recording periods, overtime factors, approval workflows, etc. then additional timesheet configurations will be required.
The timesheet configuration defines multiple options related to a resource.
-
- The start date of the timesheet and cost and billing factors
- Interval of the timesheet
- The approval levels of the timesheet
- The approval levels of the expense report
To create new entries in Timesheet Configurations List:
Navigate to the Role Center > Setup >Resource Setup > Timesheet Config List
General Fast Tab
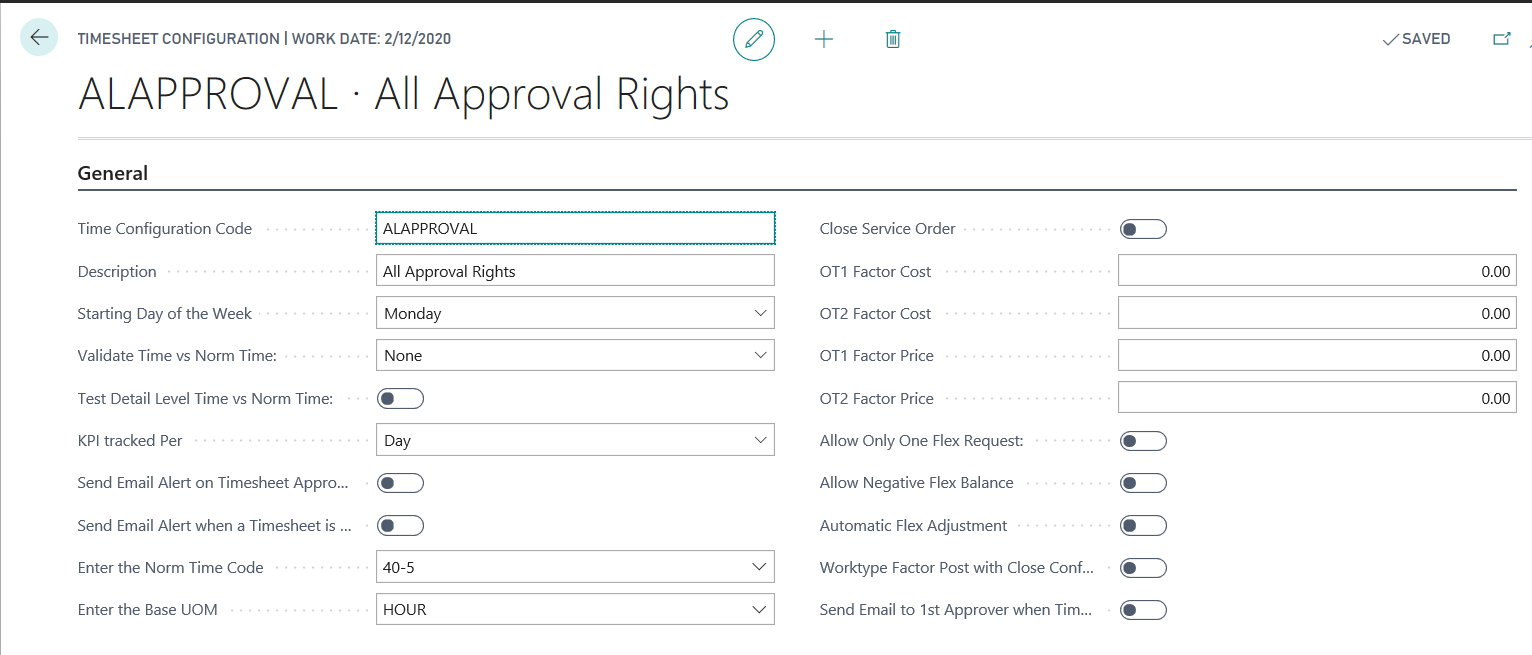
- Time Configuration Code: Enter a unique code that will be used to identify the timesheet configuration setup.
- Description: Enter a description that will be used to identify the timesheet configuration setup.
- Starting Day of the Week: Enter the starting day of the week for timesheets. All resources that have this timesheet configuration associated to their resource card will have the same first day of the week on their timesheet.
- Validate Time vs Norm Time: This setting allows comparison of time entered on the timesheet to the norm time setup for this resource. An error message will be displayed during timesheet entry depending on the option selected. Options include:
- Exact Hours - The resource’s hours must equal the norm time setup exactly.
- Minimum Hours – The resource must enter at least the resource’s hours defined in the norm time setup.
- None – No test will be run against the user’s entered time.
- Test Detail Level Time vs Norm Time: This option works in connection to the validate time vs norm time option above. If you choose exact hours or minimum hours, then norm time will be validated. This option determines if the validation will be determined based on the total hours on the timesheet, or the hours entered for each day. Select this option if you want the daily time to be compared to daily norm time. If this option is not selected, then any value can be entered within each day of the timesheet and it will not be validated against norm time by day. If you choose exact hours for validate time vs norm time then the validation will occur for the total hours for the week, not each individual day.
- Send Email Alert on Timesheet Approval: Send an email alert to a resource when a timesheet has final approval or a rejection.
- Send Email Alert when a Timesheet is not submitted: Select this option if email alerts need to be sent if timesheets are not submitted. This configuration option is used when the send email if period not closed option is used.
- Enter the Norm Time Code: From Norm Time Setup, the norm time chosen here will be the basis for creating capacity of the resource. The Update Capacity feature will generate capacity for a resource based on their normal working schedule (norm time). If the norm time assigned to this configuration is 8 hours each day of the week, then Update Capacity will create a normal working hours of 8 hours each day for the resource.
- Enter the Base UOM: Specifies the base unit used to measure the resource, such as hour, piece, or kilometer.
- Close Service Order: Check this box to allow the user to close a service order.
- OT1 Factor Cost: This overtime factor will be applied to the direct unit cost and unit cost on the timesheet for resources that are setup with the hourly pay type on the resource card. This factor is used when the time pay type of overtime is selected on the timesheet | time entries line.
- OT2 Factor Cost: This overtime factor will be applied to the direct unit cost and unit cost on the timesheet for resources that are setup with the hourly pay type on the resource card. This factor is used when the time pay type of overtime2 is selected on the timesheet | time entries line.
- OT1 Factor Price: This overtime factor will be applied to the unit price for timesheets. This is used for resources that are setup with the hourly pay type on the resource card. This factor is used when the time pay type of overtime is selected on the timesheet | time entries line
- OT2 Factor Price: This overtime factor will be applied to the unit price for timesheets. This is used for resources that are setup with the hourly pay type on the resource card. This factor is used when the time pay type of overtime2 is selected on the Timesheet | Time Entries line.
- Allow Only One Flex Request: Select this option if only one flex request can be made at a time.
- Allow Negative Flex Balance: Select this option if the resource’s flex balance can go negative.
- Automatic Flex Adjustment: Select this option to allow automatic flex adjustments.
- Send Email to 1st Approver when Timesheet submitted: Select this option to send an email to the 1st approver after the timesheet has been submitted.
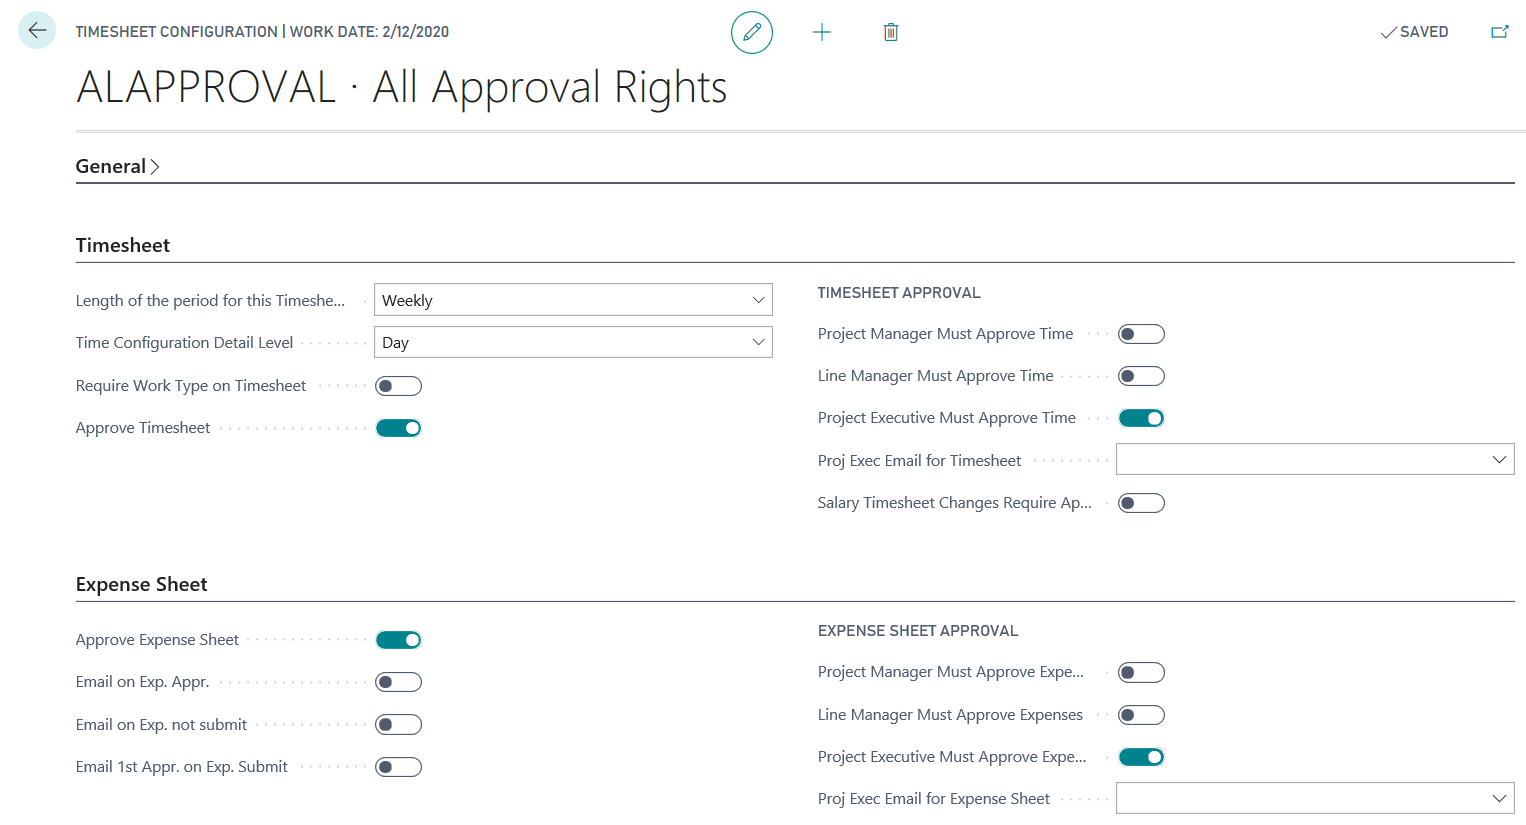
Timesheet Fast Tab
- Length of the period for this Timesheet Configuration: This setup determines the periods created during the Create Periods process. Options include:
- Daily – Only one day will show on the timesheet.
- Weekly – One week will show on the timesheet.
NOTE
the week ending day is always Sunday. There are no setup options to establish a different week ending day.-
- Split Weekly – One week will show on the timesheet. When a week spans more than one month it will be split into two timesheets. If split weekly is used, then periods will be created to cut off on week ending Sunday. If Sunday is not the last day of the month then 2 additional split weeks are created based on last day of the month.
- Monthly – One month will show on the timesheet. If the timesheet is setup as monthly the periods will be created to cutoff on the last day of the month.
- Time Configuration Detail Level:
- Day – Time will be recorded each day.
- Week – Time will be recorded each week.
- Month – Time will be recorded each month.
- Require Work Type on Timesheet: If selected, the Work Type will be required to be entered on the Timesheet.
- Approve Timesheet: Selecting this option will allow you to define which approvals are required for resources associated to this timesheet configuration. When this option is selected, 3 additional options are available to define approval. The approval options are:
- Layer 1 - Project Manager must approve time
- Layer - 2 Line Manager must approve time
- Layer 3 - Project Executive must approve time.
- Timesheet Submission Message: Specifies custom message to display on timesheet submission.
Expense Sheet
- Approve Expense Sheet: Selecting this option will allow you to define which approvals are required for resources associated to this expense sheet configuration. When this option is selected, 3 additional options are available to define approval. The approval options are:
- Layer 1 - Project Manager must approve expenses
- Layer - 2 Line Manager must approve expenses
- Layer 3 - Project Executive must approve expenses.
- Email on Exp. Appr.: Send an email alert to a resource when an expense has final approval or rejection.
- Email on Exp. not submit: Check this box if email alerts need to be sent, if expense sheets are not submitted. This configuration option is used for the open expense items which are created but not submitted.
- Email 1st Appr. on Exp. Submit: Check this option to send an email to the 1st approver after the expense sheet has been submitted.